 I built Nessy in the summer of 2005. This was written in 2006 for Duckworks Magazine.
It was reading my 10-year old daughter her bedtime story that decided me to build a sailing dinghy after decades of rowing. It was Swallows and Amazons, the classic tale of children spending their holidays sailing in the Lake District in the 1930s.
What impressed both of us was the way their parents let them go out on their own for days on end without supervision or even mobile phones. There is no mention of PFDs either. Their father, at sea with the Navy, gives his permission in a telegram reading "BETTER DROWNED THAN DUFFERS IF NOT DUFFERS WONT DROWN".
I mean, if my wife and I arranged our family holidays like that they would take the kids into what they laughingly call "care" and put us away for a thousand years.
Anyhoo...Nichola seemed keen on learning to sail so I started looking for a design.
Simplicity was key. In the book, Swallow was said to be ideal for children because it had a single sail and no centreboard, and that seemed good me too – I haven’t handled a sail in thirty years although I have been rowing all that time.
Bolger and Michalak designs were obvious contenders but I wanted something more traditional, in appearance at least.
It would also have to be built mainly outside on a gravel surface so precision engineering would be impossible.
At the 2005 Thames Boat Show at Beale Park I tried the Sandpiper, a Bolger-inspired flat-bottomed skiff designed by Conrad Natzio. It was just the job - simple and robust but with a jaunty workboat look.
I bought the plans from Conrad at the show, and started the search for cheap materials and parts as soon as I got home. I was under the usual delusion that it would be on the water by teatime.
Despite my resolution to stick rigidly to the plans, the first thing I did was change the butt straps joining the plywood sheets to epoxy tape. I hoped the epoxy would be invisible and the gentle curves of the ply did not look like stress hazard.
Dave Carnell's invisible butt joints offered an enticing combination of effectiveness, speed and simplicity - just the thing for a lazy and hamfisted builder!
My big mistake was to not to join the ply sheets before cutting. That way, I could have easily kept the edges nice and straight. As it was, I had to tape and epoxy the ends of two long side pieces while trying to keep them straight and inevitably ended up with one slightly banana shaped. The necessary adjustment means that the finished boat is an inch or so less freeboard than planned but so far no-one seems to have noticed....
I tested the joints scientifically by giving the side pieces a vigorous shake – and one failed. However, by then I knew the drill better and the finished parts passed the shake test with flying colours.
The next mistake was not to give the plywood a bit of a sand while it was all nice and flat, which might have saved a lot of effort later on.
And then there was the transom. I bevelled the edges the wrong way, so the frame was on the outside as though the boat had its trousers on inside out. I concealed this with an extra skin of ply, which actually makes the boat look a bit smarter at the stern.
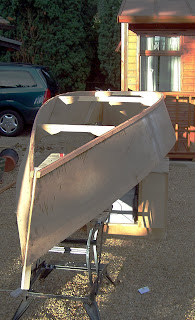
Construction then moved outdoors, onto an old bedroom cupboard and a

couple of saw horses.The boat is assembled on the frames without the need for a strongback. Quick and simple. I began to appreciate the jigless, low precision construction method, ideal for those with no proper facilities.
I also began to appreciate my son's friends.
When I found I did not have enough hands to hold the gunwales and chine logs in place for clamping, I grabbed a couple of son’s friends as they passed and, to my surprise, they helped willingly and even showed an interest. Then reverted into layabouts. Sigh.
One serious delay was not daring to get on with the sail, as I really did not have a clue despite reading Dave Gray’s excellent advice at http://members.aol.com/r7dg/library.htm. Eventually I screwed up

my courage to the sticking point, as the poet says, and bought a white polytarp on eBay (15 quid), a couple of rolls of double-sided carpet tape and some white duct tape. Waited till the wife went out for the day and cleared the dining room for a sail loft.
I had never thought that the eyeleting punch and die that my father left me (with a few hundred brass eyelets in a jamjar) would ever come in handy, but their time had come. The sail looks much better than my terrible craftsmanship would justify.
Launch day was not until January. The official temperature was about zero, but the sun was out and there was only breath enough of wind to fill the sail. For a maiden voyage, it was heaven.
The following week I sailed at Dell Quay (where the Romans invaded in 43AD) and a photographer called Bryan Davies was there. I yelled out my email address and by the time I got back these pictures were waiting in my in tray. Isn’t technology wonderful?


